Creating Stunning Designs for Gloss Ink Printing on Your Flatbed UV Printer
If you’re a regular reader of this blog, you’ll know how much we love the versatility of UV flatbed printers and their ability to bring the user's creativity to life. Once you’ve mastered a few techniques, there are very few obstacles to customising all sorts of objects and wowing your customers with what you can produce.
In this article, we’ll provide a walk-through guide to a particularly effective method of bringing your designs to life using a feature unique to UV printing – printing with gloss ink. Here’s how to create your design and print it.
Why We Love Gloss Ink
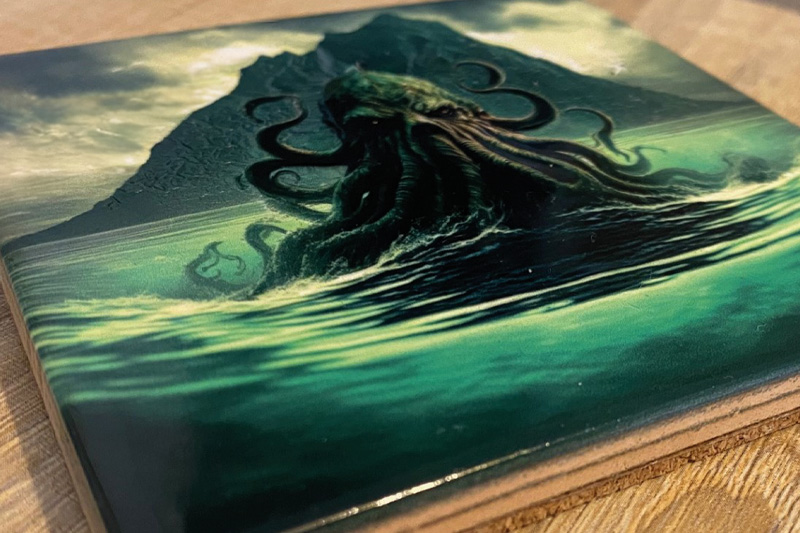
Printing with gloss ink has some fantastic advantages, not least that it can provide fantastic contrasts in texture. Whether you are producing packaging prototypes or even tactile signage, gloss ink demands to be touched. Our design featured in this article uses this contrast to great effect.
A close-up of packaging with gloss ink creating texture
We know that UV print is an ideal method of customising any number of objects. The only real stipulation is that the surface is flat and that it fits on the flatbed and underneath the printheads. For the purposes of the demonstration, we've selected a ceramic coaster as our object of choice, but the technique described can be performed on your substrate of choice. For a comprehensive look at what you can print on with UV ink, you can read our article here.
The Artwork
We wanted a design that would have some varying texture to it, so after a little search on an online stock image library, we found a .JPG image of a sea monster. The image had rich colours and we felt that the gloss ink would work well recreating the wet creature and water in the foreground, which would contrast with the sky and mountain in the background.
A person researching options using a computer
We measured the coaster so that we could design the file in the correct size so that when it came to printing, we didn’t have to make any alterations to the dimensions. We used Adobe Illustrator to set up our design file, but what design software you use is really down to personal preference. Our artboard was set to 100 mm x 100 mm.
Creating Our Design
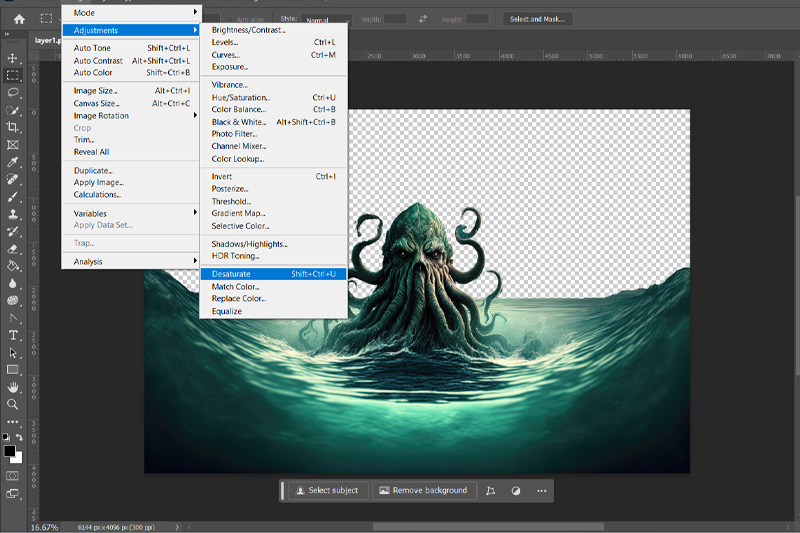
The print would require the image layer and a gloss layer, so our next step was to create a mask of the sea and the creature. We opened the .JPG file in Photoshop, selected the area we wanted to print gloss and created the mask. The tentacles were the trickiest part to mask, but the image was a high enough resolution so we could zoom in to tackle it.
Creating the layer mask in Photshop
Having saved the masked layer separately, we dragged both the full image and the layer into Illustrator and created two layers on the artboard. We named the masked layer “RDG_GLOSS” so that our VersaWorks RIP software would recognise it as a gloss ink layer. It was important that they lined up perfectly so the gloss would print in the right places
Next, we needed to convert this RDG_GLOSS layer to greyscale. This removes the colour and replaces it with gradients of black. The reason for this is to create a file that has only colour ranging from zero (white) to 100% (black), mirroring the gloss ink channel which similarly can print from 0 – 100% to build texture. This is a great technique because when replaced with the gloss swatch in the next steps, the darker elements of the image are printed with greater depth than the light elements.
We then selected the gloss swatch from the Roland Color Libraries* to replace the gradients of black with gradients of gloss ink. Converting the image to grescale
TIP*: To use the swatches in Roland Color Libraries, download it from our website, then open the swatches tab in Illustrator and select “Other Libraries”. Locate the downloaded file titled “Roland VersaWorks” and open, then select the swatch titled “RDG_GLOSS”.
We then saved our file as a PDF so that we could open it in VersaWorks 6 with both the vector gloss ink information and the original bitmap artwork file.
Labelling the gloss layer in Illustrator
Preparing the Print
Once we had exported our file, we needed to calibrate our printer. We used a plastic corner guide to position the coaster at the zero point on the flatbed and ensured that it was aligned correctly. Using the controls on the machine, we set the correct print height and determined the print area.
A person positioning an object using a corner guide
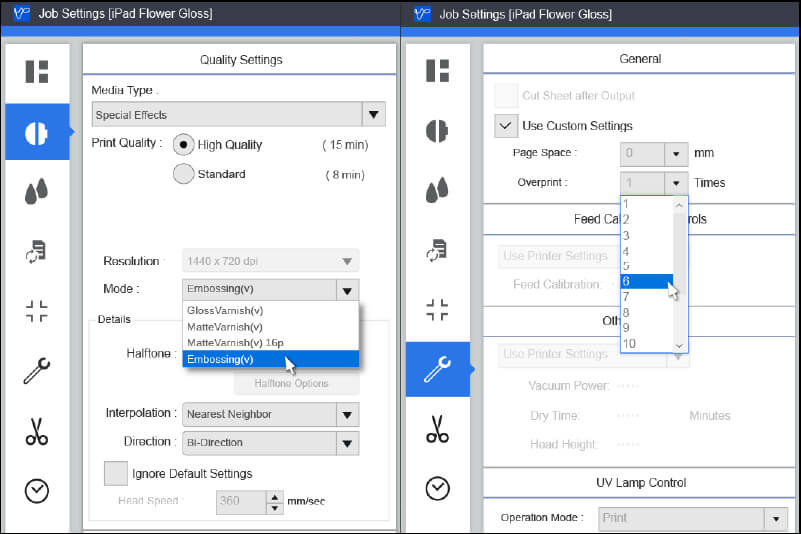
Our next step was to import our file into VersaWorks 6, Roland DGs intuitive RIP software. Here we could make any final amendments to the file if needed and ensure the print settings were correct before we pressed print. Many of the settings are programmed directly on the printer settings, but there were still some to check in the RIP. In Quality Settings, we chose the “High Quality” option, then we ensured the printer could see the gloss ink layer under Special Items in Document Information.
We also chose to conduct a test print using Draft Mode to ensure we would place the coaster as well as possible. Draft Mode prints a thin layer of ink to help you to test your settings.
When we were happy with the placement of our coaster and the calibration of our machine, we pressed print. The printer printed the image first, then moved on to the gloss layer. There are several gloss modes available in VersaWorks which create either Matte, Gloss or Emboss effects using UV flatbed printer lamps. In our case, we used the latter due to its ability to build in layers and maximise the effect. This is simply adjusted by increasing the ‘overprint’ setting in VersaWorks. Image showing how to select special effects in VersaWorks
The outcome was great, we really liked the effect the gloss had on the water, giving it a wet, shimmering look. The different amounts of gloss ink made some parts of the print rough and others smooth, which really added to the end result.
A coaster with the gloss ink sea creature printed on it
Conclusion
UV print really allows you to get creative and gloss ink is a fantastic way of adding different effects to your designs. It gives it texture and really amplifies the vibrancy of your colours. This demonstration focused on just one method of printing with gloss ink, but there are several other techniques that can give excellent and varied results.
So, why not find some objects to practice on and start experimenting? We’ve got lots of information on UV printing in our blog, but if you’d like more information on anything mentioned in this article, our experts would be happy to help. .