
There’s an affordable and easy entry into the print and cut market for many aspiring small businesses and hobbyists wanting to create custom runs of stickers, labels, garments, and graphics.
This article aims to introduce you to the different print and cut methods to help you get the best results from your printer/cutter.
What is Print and Cut?
Print and cut is a cost-effective, low-footprint method of producing a broad range of products, from clothing and accessories to graphics, signage and decals.
You can print highly intricate designs and cut them to the exact shape you want – think skateboard stickers, vehicle wraps and t-shirt graphics. There are lots of applications and if you’re in need of a little more inspiration, you can find some here.
Print and cut machines print ink onto a print media and cut out the shape (but not necessarily in that order – more on that later). Set correctly, the blade should cut through the vinyl layer and not the backing sheet, unless it’s set up to do so. You can then weed any of the unwanted vinyl away from your cut design.
A printer/cutter can perform both processes from a single machine, or you can use a printer and a separate cutter to print and cut independently. In this article, we will examine the different methods and delve into the benefits of each.
What Media Can I Print and Cut?
The media that you can print and cut would normally be adhesive or heat transfer vinyl, with a few exceptions, such as card used during packaging prototyping.
- Adhesive – Typically vinyl of differing quality and qualities depending on the desired application, with a backing that sticks to the surface it’s applied to
- Heat Transfer – Vinyl that is activated by a heat press, used for garments and other textiles
Read more: A Beginner’s Guide to Print Media
Five Methods of Printing and Cutting
Print and Cut with a Single Device
In most cases, cutting would take place after the print has been laid down onto the substrate. This is the default and works perfectly for most users and the materials they are printing onto.
A RIP (in our case VersaWorks 6) is used to manage the print file (usually a PDF or EPS) and export it to a format the printer can read.
When you are happy with the settings and have clicked “print” on multiple stickers, for example, the print head will pass over the media, laying the ink. Once it has printed all your stickers, the printer will return to its original start point and begin cutting out the shapes.
Cut Then Print
Most of the time, printing before cutting works just fine. However, there are some substrates and some situations that benefit when the process is reversed.
Some sensitive substrates might shrink or curl when exposed to the heat of the print bed, or perhaps due the absorbency of the material. This ink absorption rate is determined by the chemical composition of the media and is usually adjusted for by a media profile in your RIP software.
Some accuracy issues could also occur in situations where a material proves challenging to cut after the ink has been laid. By cutting before printing, these issues can be avoided.

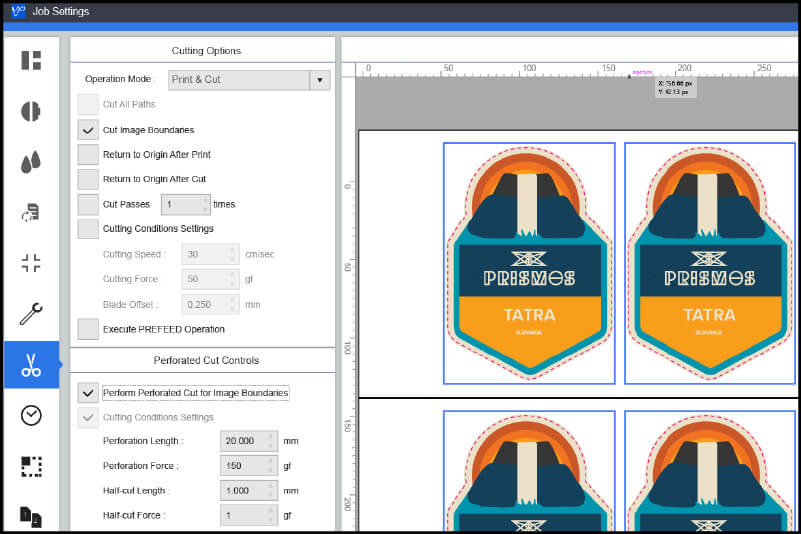
To change the operation mode in VersaWorks 6 to “Cut & Print”:
- Open your job by double-clicking the file or using the Settings button
- Click the scissors icon (Cut Controls) on the left-hand menu
- Select “Cut & Print" from the Operation Mode drop-down menu at the top of the screen
- Set up the rest of the job as normal, RIP, then print
The printer will perform the contour cut, wind back to the original start point, and then print.
Custom Cut
CustomROLL is the default media size setting in VersaWorks 6, meaning it has an undefined length, and the printer will keep printing until the job is done before returning to the start point and beginning the cut operation.
Roland DG printer/cutters are designed to maintain accuracy over distance but sometimes when printing much longer jobs, multiple metres in length before cutting, issues can occur.
This is because of the mechanical process involved in printing 10 m of material and winding it all the way back into the machine through its pinch rollers before cutting. Any misalignment could potentially be multiplied over the course of the job.
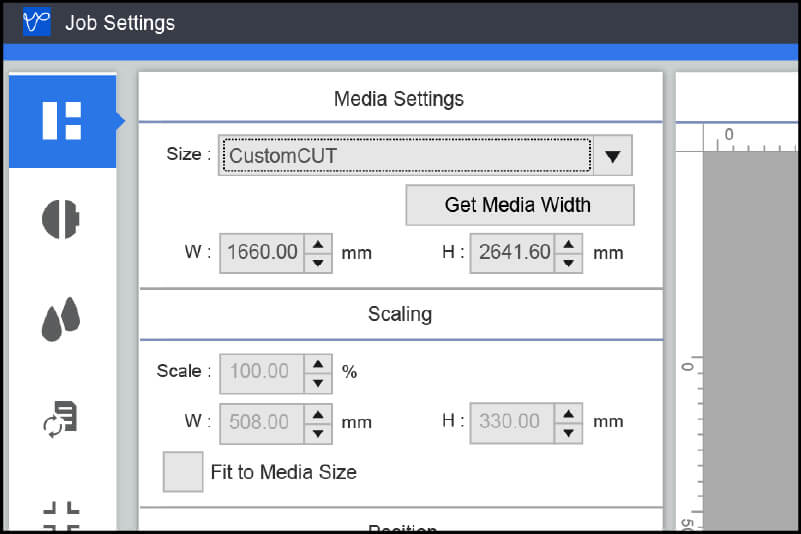
By selecting CustomCUT in Media Settings in the Layout tab, you can set the length (labelled as height) of the media. This will let the machine cut more regularly and ensure accuracy over longer runs.
To minimise media wastage when using this setting, try to use a height that matches your job size and doesn’t generate significant white space between the custom cut artboards.
Print and Cut on Separate Devices
Having print and cut functionality in one machine is the perfect option for many users, keeping things neat and tidy and in one place. But there are times when it is beneficial to use a dedicated printer in tandem with a dedicated cutter.
Keeping the printer printing and the cutter cutting is especially useful for high print volumes. Once one print job is complete, you can take it off the machine and load it onto the cutter while the printer gets started on the next print job.

To make sure the alignment is correct when loading between machines, you need to make an alignment point using crop marks. This is done by selecting the Mark tab on the Job Settings menu in VersaWorks and ticking the Crop Marks (Print&Cut Alignment) box.
You can select between three options for how regularly you want the crop marks to be printed and read during cutting, with each option increasing the cutting accuracy, from area to row to data entry. Your machines will read these marks so everything lines up as they should.
This process works whether you use roll-fed machines or a flatbed cutting table and VersaWorks is capable of outputting not only Roland’s Quadralign crop marks but others such as Fotoba.
Perf Cut
Most of the time, the cut function is used to cut through the vinyl without penetrating the backing sheet. The right pressure of your blade should make weeding easy with the correct tools but avoid picking at the vinyl so it catches and causes a jam.
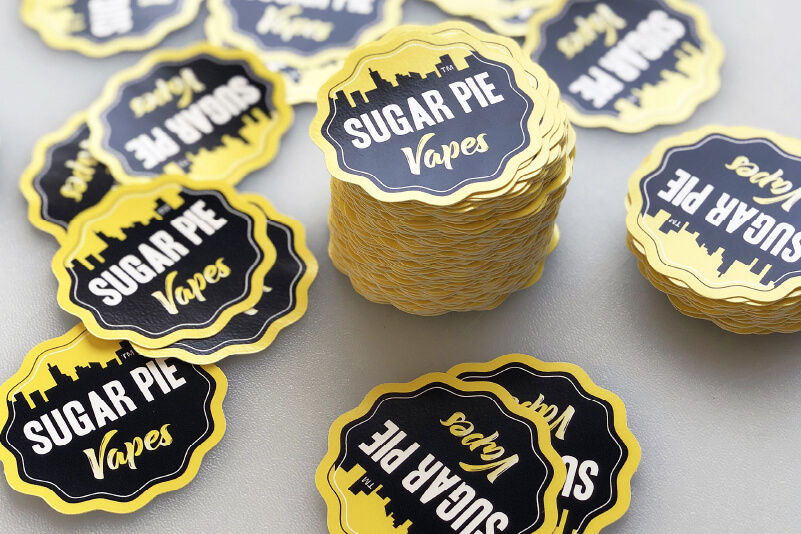
Perf (or perforated) cut lets you cut through the backing layer too. This is particularly useful for making die-cut stickers when you need to send them to the customer with the backing intact and in various sizes and shapes.
Perf Cut is a tick box that can be found in the Cut Controls of the Job Settings menu in VersaWorks 6. Using this setting, you can apply a basic perforated cut around your design but for more advanced options, you can program cutlines using a spot colour called PerfCutContour in your design package.
Conclusion
If you’re trying to decide whether to buy a printer/cutter or separate devices, you can read our article here to find the advantages of each approach. You can also get in touch with a Roland DG expert who will be happy to discuss your options and identify your ideal