The wedding market has served as inspiration behind our latest series of articles that focus on ways to produce personalised products. It’s an area full of opportunities for digital print professionals as the global wedding industry is expected to reach $128 billion by 2026, growing at a CAGR of 4.9% from 2021 to 2026 1.
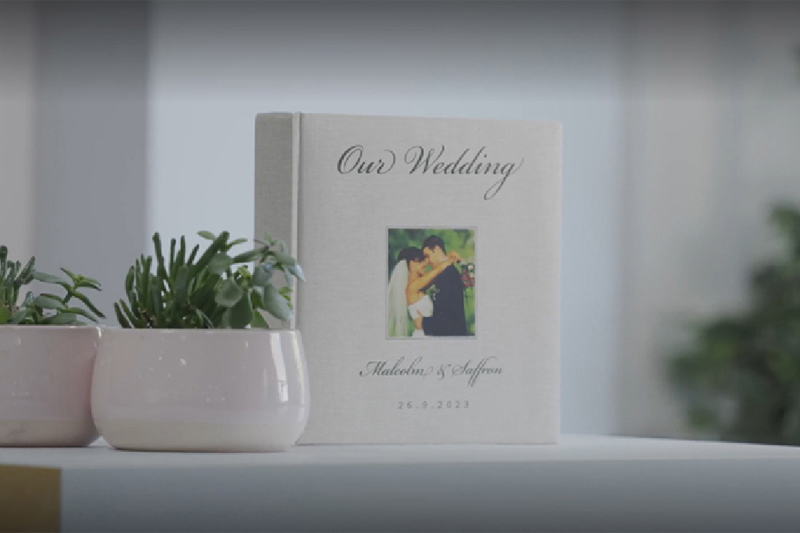
So, the big day has been and gone and it’s time to record all those special moments. In this article, we’ll show you how we personalised a linen-covered wedding album using direct-to-film print, a process that can work for all sorts of other fabric personalisation too.
Equipment used:
The Artwork


Printing the Transfer
- The BN-20D was pre-loaded with DTF transfer film on a roll, so we checked that it was loaded straight and in line with the pinch wheels. Once the print wheels were engaged, the machine automatically calculated the media width. It’s always advisable to speak to your supplier to source the best material for you, but the BN-20D uses S-F164 film.
- We then performed a test print to ensure that all the ink nozzles were firing correctly, and the bidirectional alignment was properly configured for the media installed.
- We exported our design file as a PDF and opened it in Roland DG’s VersaWorks 6 RIP software. Roland machines are compatible with many popular RIPs, but using software specifically designed for your device is often the best way forward.
- With the design already set at the right size when printed at 100%, we ensured that the other Job Settings were correct before pressing print. We chose “CustomROLL” as the size in Media Settings and clicked the option to “Mirror” in Print Properties so that the transferred image would be properly orientated when applied to the album cover.
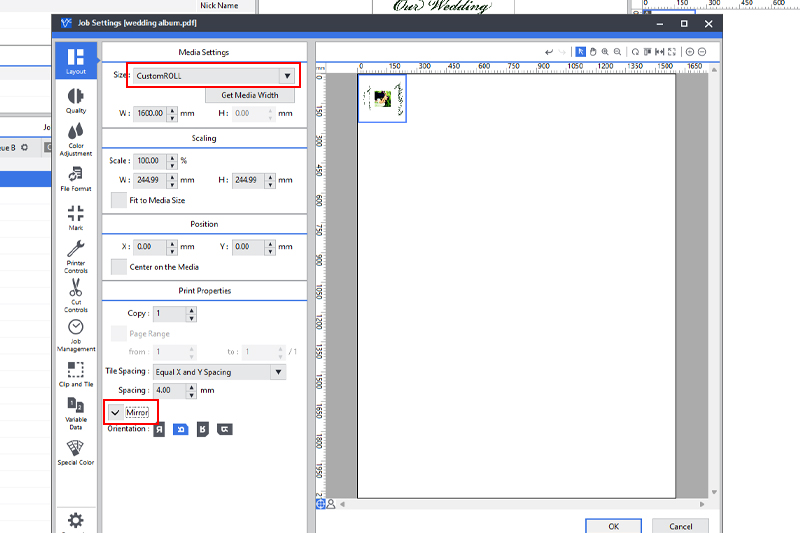
Media settings highlighted in VersaWorks 6
In Quality Settings, we selected “High Quality” and in Colour Management we chose the “True Rich Color 3” preset, which gives us a wider colour gamut for bolder print, as well as exceptional image quality. - When we were happy with our settings, we pressed Print.
Preparing the Transfer
- Once the printing had finished, we cut the film from the roll and into a manageable size, leaving enough space around the edges of the print so we wouldn’t touch the ink.
- We covered the printed film with our adhesive powder and spread it liberally over the ink to ensure it had a good coating over the entire design. We gave the film a solid tap to remove excess powder so that it wouldn’t leave sticky marks where it shouldn’t.
- To activate the adhesive powder, we heated the film for two minutes in our oven at around 130 °C (a process that can be done underneath a heat press if you don’t have an oven). It was easy to see any areas where the powder hadn’t melted properly, so we put it back in the oven until it was ready.


Applying the Transfer
- Unlike a printed t-shirt or other fabric applications, there was no need to pre-treat the linen-covered album, but we wanted to be sure that the heat press wouldn’t cause any damage to the pages, so we opened the album up and placed only the cover on the press.
- With our heat press preheated to 150 °C, we applied the transfer film face down onto the album, ensuring the right placement and orientation. To stop the heat press from singeing the linen cover, we put a non-stick protection sheet on top, then closed the press for 15 seconds.
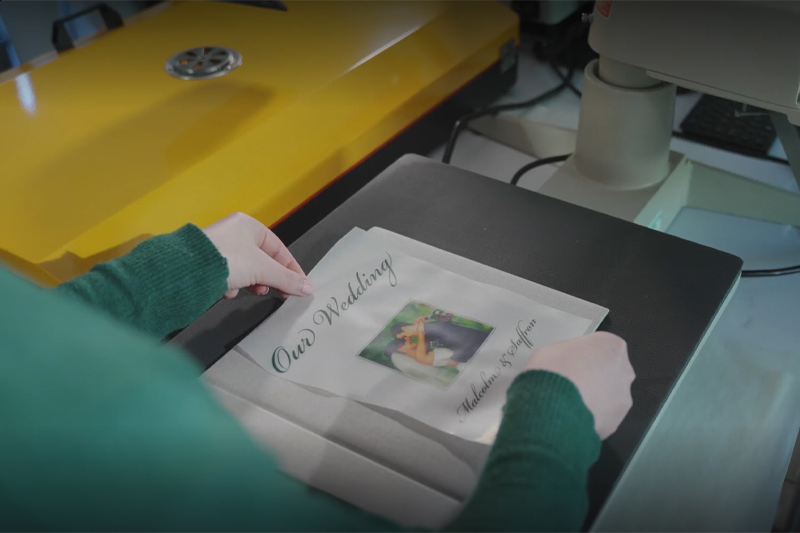
Placing the design on the album cover on the heat press - After we removed the album from the press, we allowed it to cool for a minute or so before carefully peeling the backing film off the album cover. We were delighted with the transfer and impressed at how solidly the ink adhered to the cover, even the fine details of the script typeface. The text was legible without any breaks that would suggest the ink hadn’t transferred properly, and the image was crisp and clear.
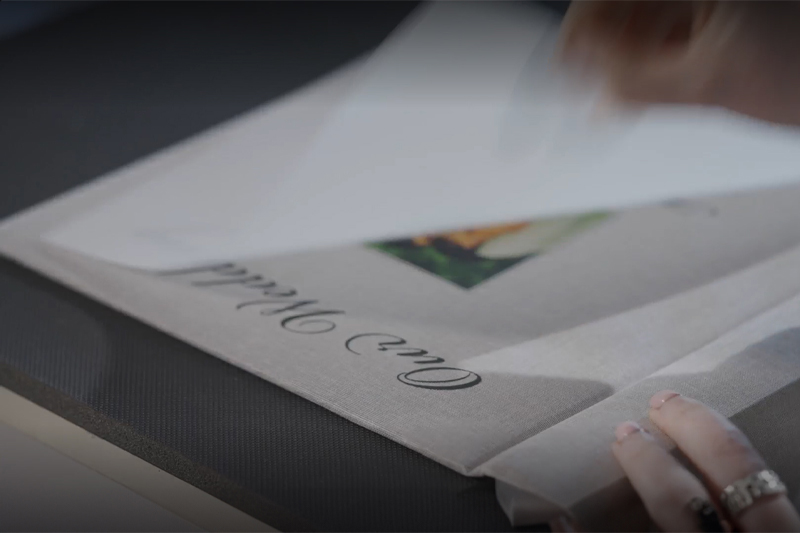
Peeling the film off the album cover
Conclusion

DTF transfers are usually used to customise garments and other fabric items, so we were intrigued to see how it would cope with a less traditional application. We were very pleased with our wedding album and would recommend DTF as a fairly quick and simple way to personalise such an important keepsake.
If you’d like to know about other wedding applications we’ve tried, check out the rest of our series, which has more ideas for products you could add to your business.
Otherwise, if you have any questions, get in touch with a Roland expert who’ll be happy to help.
1. ResearchAndMarkets. "Wedding Industry - Global Outlook and Forecast 2021-2026." October 2020.