VersaWorks 6 is the latest version of Roland DG’s powerful but user-friendly RIP solution that helps make your print process quick and easy. It opens up the possibilities of your printer and ensures you are getting as much from your machine as you can.
To squeeze even more out of VersaWorks 6, here are our top tips for using the package when UV printing.
Print Faster with the Clip and Tile Function
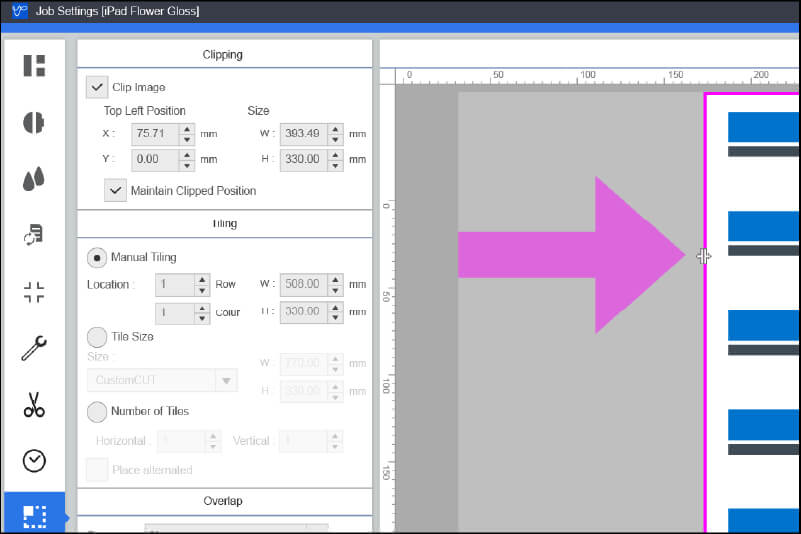
When VersaWorks reads an artwork file, it won’t distinguish excessive amounts of white or blank space from the actual design information. Therefore, the print carriage will travel over this white space rather than stopping at the edge of the design, which leads to longer print times than necessary on a flatbed UV printer.
To prevent this, VersaWorks has an in-built Clip and Tile function that lets you remove this space and reduce print times. It acts very much like a crop tool in Photoshop or similar programmes and is very intuitive to use. Once your artwork is optimised to make best use of the space, you can clip the printable area to the edges of your artwork.
Print Uneven Objects with Generic Distance Mode
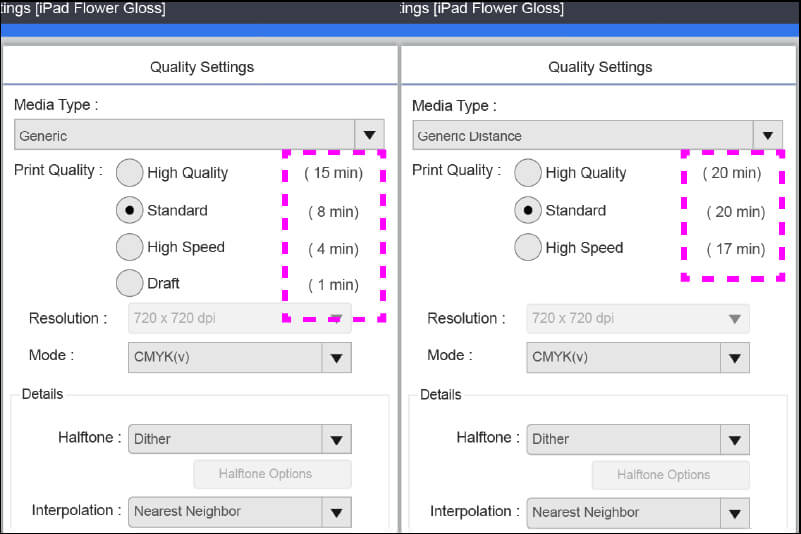
Not all products or substrates that you print on with a UV flatbed printer are perfectly flat. VersaWorks’ Generic Distance mode is designed to help you work with items that have a slightly undulating surface or ones with higher and lower areas. To ensure that the print is of optimal quality, however, make sure that the variance isn’t any more than a couple of millimetres.
Generic Distance mode works by slowing down the print head, helping it to manage any irregularities on the print surface. It also fires slightly larger ink droplets which travel better over longer distances, keeping your image even on a surface that isn't perfectly flat.
It’s also possible to print special effects using white and gloss ink using Distance Mode, which we will go into more detail on later.
Checking Artwork for Gloss, White and Primer Inks
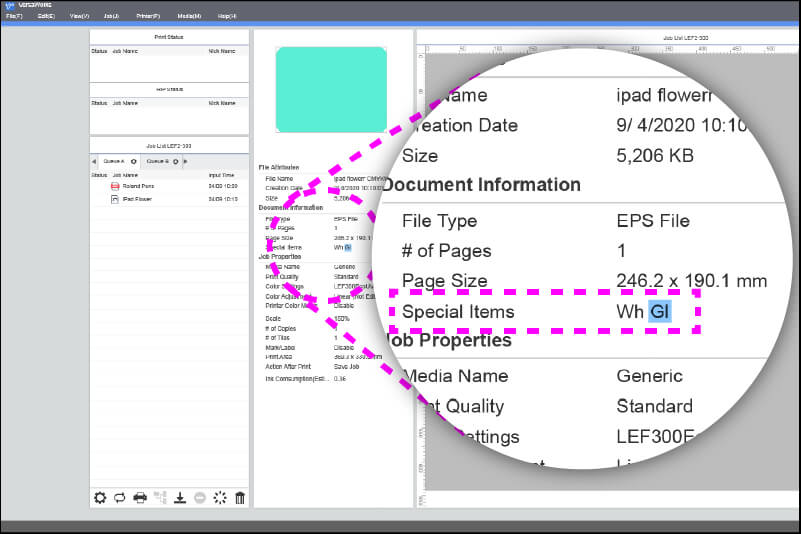
Gloss, white and primer inks are great for adding special effects to your substrate – think realistic water droplets, animal skin textures, printed Braille, and a lot more besides. They can also improve the results of printing onto different coloured objects using white inks or for priming items that are hard to print.
You can double-check which special items have been created in a design via the Document Information section in the middle of the VersaWorks interface. The key for these is as follows:
- Wh – White Ink Design Information
- Gl – Gloss Ink Design Information
- Pr – Primer Ink Design Information
VersaWorks also makes it easy to check where these white and gloss elements are in the design, so you can always keep track of the bits outside of the normal CMYK range.
If you are using a vector image, you can use VersaWorks to add a white, gloss or primer layer, either to the print area, outside the print area, or flood fill, so there’s no need for any additional design software.
Build Textured Layers with the Overprint Function
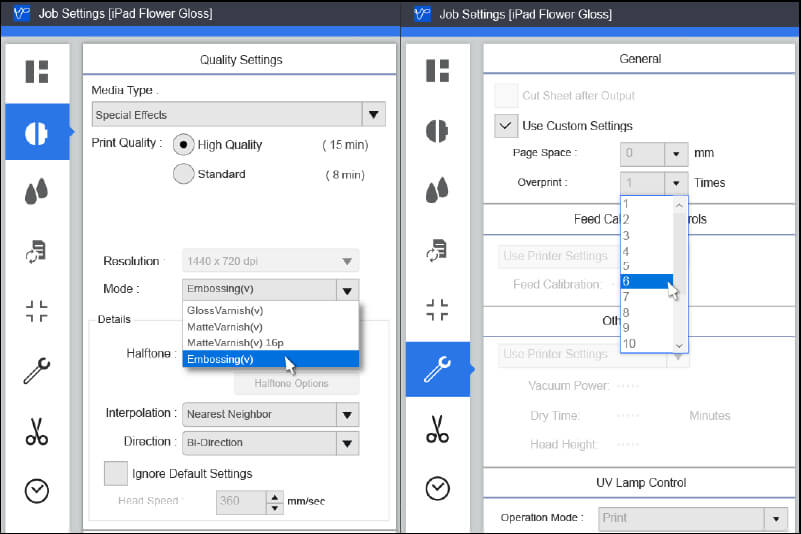
Your UV flatbed printer can build up gloss ink in layers to achieve a texture when used in conjunction with VersaWorks. Embossing essentially lays down multiple layers of matte varnish with a gloss finish on top. Using VersaWorks, you can quickly set the number of layers that you want to print to get the most impactful results.
In addition, this spot UV process can be cured in various ways to give you different finishes, such as a shiny gloss or a flatter matte. Building up the layers like this can even give the print an embossed effect.
Build Layers of Ink with Multiple Job Grouping and Duplication
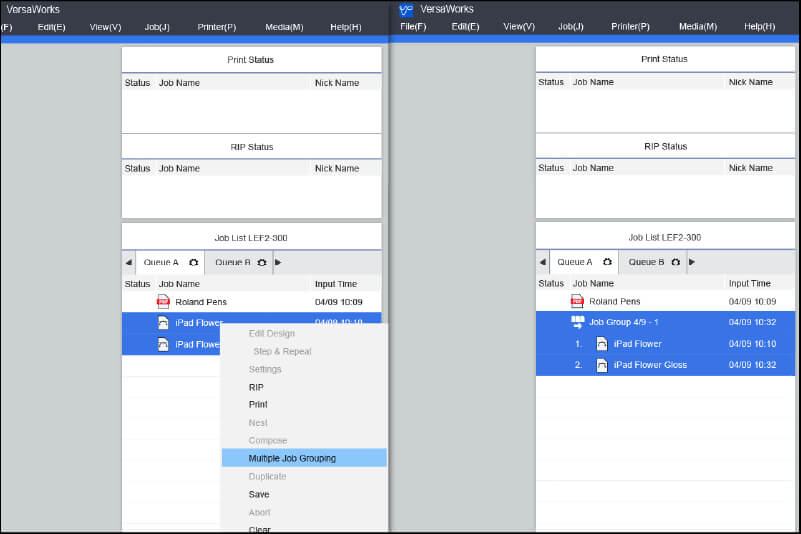
A flatbed UV printer can print CMYK along with one special ink at a time, whether that’s gloss, white or primer. So, when designs include multiple layers of these inks, the job needs to be sent through to the printer more than once.
Versaworks has Duplicate and Multiple Job Grouping functions that make life a lot easier. Sending the files to print in this way will create one job and output the layers as one, reducing the amount of time it takes to print.